MCP Integration
The Model Context Protocol (MCP) lets AI assistants connect directly to your nQuest case data. Once connected, your assistant can search cases, read synopses, browse graph data, inspect documents, and ask questions about your cases, all through your existing nQuest permissions.
Supported assistants
Section titled “Supported assistants”Claude and Grok connect to nQuest directly, with no extra software. See Connecting Claude and Connecting Grok for walkthroughs.
Other assistants that support remote MCP servers may work, either by signing in the same way or by using an API key as a bearer token.
ChatGPT connects through a custom connector rather than a server URL alone. See Connecting ChatGPT for the full walkthrough.
Connect an assistant
Section titled “Connect an assistant”Step 1: Copy your server URL
Section titled “Step 1: Copy your server URL”- Open Preferences (macOS) or Settings (Windows) in the nQuest desktop app
- Go to the MCP tab
- Copy the Server URL from the Connection section
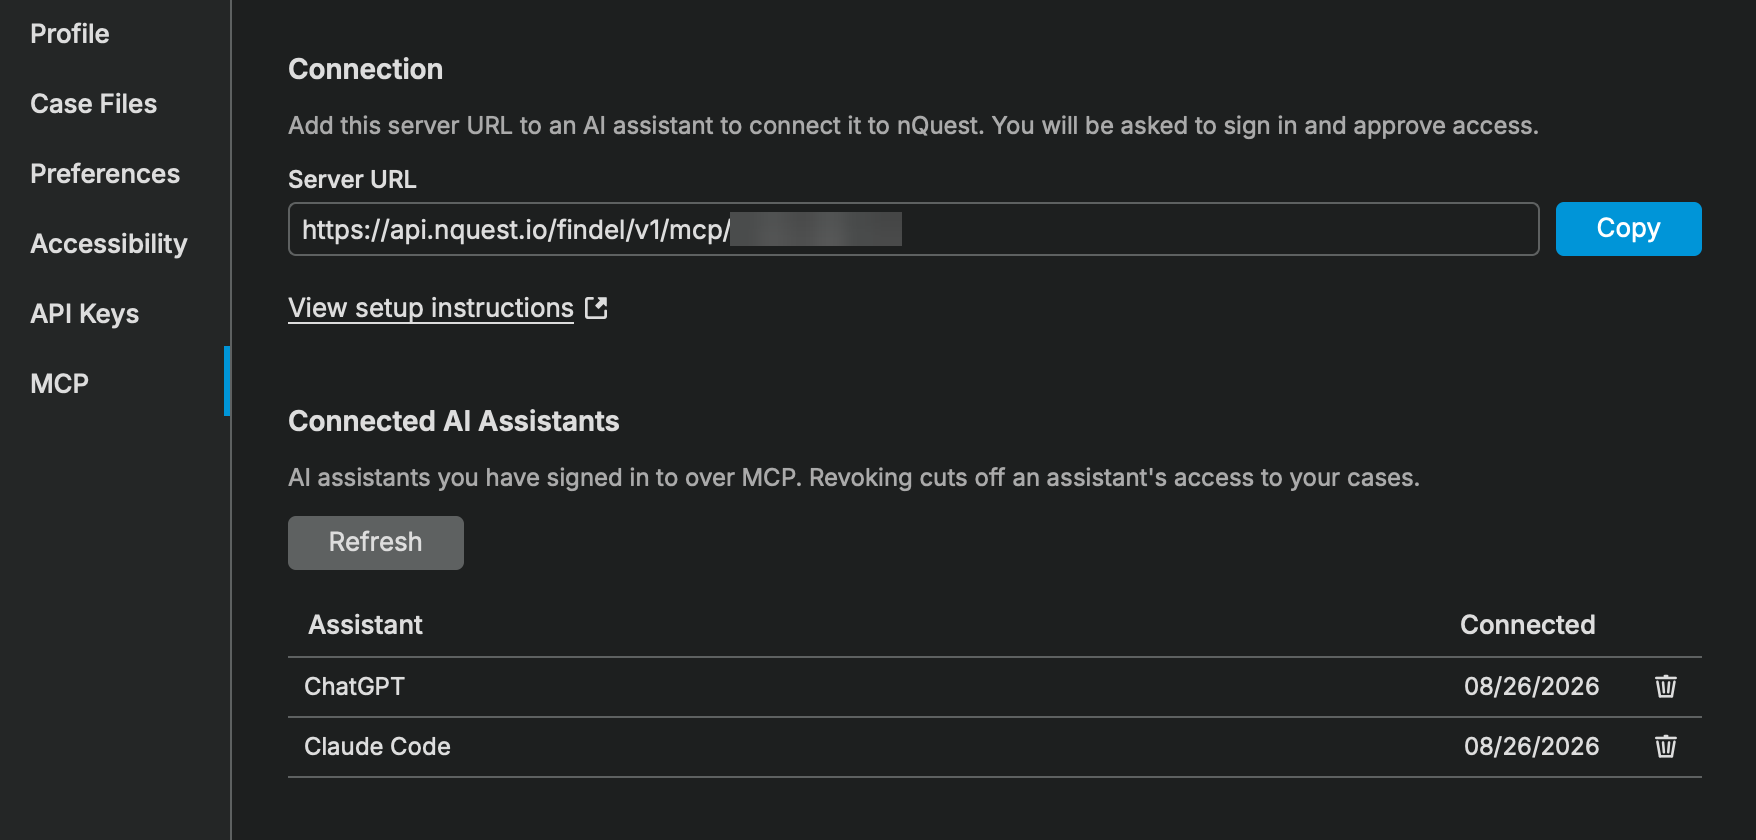
The MCP tab in Preferences, showing the server URL and connected assistants
Step 2: Add the server to your assistant
Section titled “Step 2: Add the server to your assistant”In your assistant, add nQuest as a remote MCP server over HTTP and paste the server URL from Step 1. There is nothing else to enter: no client ID, no secret, and no API key.
Where that setting lives differs by assistant. Look for “MCP servers”, “Connectors”, or “Add custom server” in its settings, and refer to your assistant’s own documentation for the exact location.
In Claude Code, add it from the terminal:
claude mcp add --transport http nquest <your_server_url>Step 3: Sign in and approve access
Section titled “Step 3: Sign in and approve access”The first time your assistant contacts nQuest, it opens a browser window:
- Sign in with your nQuest account, the same way you sign in to the desktop app
- Review what the assistant is asking for, then approve
Your assistant is connected once you approve. You will not be asked again unless you revoke access or the connection expires.
Managing connected assistants
Section titled “Managing connected assistants”The MCP tab in Preferences lists every assistant connected to your account, along with when each one was connected.
To disconnect one, select the trash icon on its row, or right-click the row and choose Revoke Access. The assistant cannot renew its session or sign back in without your approval. It may still reach your data for a few more minutes, until the access token it already holds expires. Revoking one assistant does not affect the others.
It is worth reviewing this list occasionally and revoking anything you no longer use.
Using an API key instead
Section titled “Using an API key instead”If your assistant cannot sign in but can send a bearer token, use an API key:
- Go to the API Keys tab in Preferences or Settings
- Create a key with the MCP scope
- Copy the key when it is shown, as it is only displayed once
- Configure your assistant to send it as a bearer token:
Authorization: Bearer <your_api_key>The server URL is the same one shown on the MCP tab. API keys are managed from the API Keys tab, and deleting or deactivating a key disconnects anything using it.
Available tools
Section titled “Available tools”Once connected, your AI assistant has access to the following tools:
| Tool | Description |
|---|---|
| list_contexts | See your available workspaces and groups |
| list_cases | Browse cases in a workspace or group |
| search_cases | Search across all your cases using keywords or natural language |
| search_entities | Search for entities (people, organizations, etc.) across cases |
| search_within_case | Find specific information within a single case |
| get_case | View case details including AI-generated synopsis |
| get_case_graph | View the full graph of nodes and relationships in a case |
| get_case_tasks | View tasks and assignments in a case |
| get_document | Read extracted text and AI analysis from a document or image |
| query_case | Ask a question about a case and get an AI-generated answer |
| resolve_names | Look up the names behind user and group IDs |
| get_case_resources | List all files and attachments in a case |
| get_link | Generate a link that opens a case in the nQuest desktop app |
Permissions
Section titled “Permissions”MCP access respects your existing nQuest permissions. You can only see cases and data that your account has access to. The tools enforce the same access controls as the desktop app, so case-level permissions, group membership, and compartments all apply.
Troubleshooting
Section titled “Troubleshooting”- Your assistant signs in successfully, then reports an error: the server URL is probably from a different account. Copy it again from the MCP tab and re-add the server.
- Nothing happens when you add the server: some assistants only read their configuration at startup. Restart it and try again.
- No cases are visible: MCP uses your account permissions. If you cannot see a case in the desktop app, you will not see it through MCP either.
- An assistant stops working after previously connecting: check the MCP tab. If it is no longer listed, its access was revoked and it needs to sign in again.